
When I launched ZyVOP — a developer publishing platform with auto cross-posting to Dev.to, Hashnode, and Medium — Vercel felt like the obvious choice. Fast deploys, zero infrastructure management, global edge network. Perfect for moving fast.
Then the bills came in.
And then the edge function timeouts started hitting.
This is the story of why I moved ZyVOP off Vercel, how I set up a VPS with Docker and Cloudflare Tunnel, and what I'd do differently if I started over.
The Vercel Problem
Vercel is genuinely excellent for static sites and simple apps. But ZyVOP isn't a simple app.
We run:
Real-time notifications
Cross-posting jobs to multiple external platforms
An AI news feed updated continuously
Background processing for markdown rendering and KaTeX
Two problems emerged fast.
Problem 1: Cost
Vercel's free tier is generous until it isn't. The moment you hit production traffic with background jobs and API routes firing constantly, you're looking at Pro tier ($20/month) minimum — and that climbs quickly with function invocations, bandwidth, and team seats.
For a bootstrapped platform in beta, that's real money that should be going toward writer payments and content, not infrastructure.
Problem 2: Edge Function Execution Limits
Vercel's edge functions have a hard execution time limit. For simple request/response cycles that's fine. For our cross-posting engine — which needs to authenticate with multiple external APIs, handle retries, and confirm canonical URLs — we were constantly bumping against the ceiling.
The cross-posting would silently fail on complex posts. Writers would publish, think it cross-posted, and then notice their Dev.to article never appeared. That's a trust-destroying bug.
The fix wasn't to optimize the code. The fix was to get off a platform with artificial execution limits.
Why VPS + Docker + Cloudflare Tunnel
I evaluated a few options:
Option | Cost | Control | Complexity |
|---|---|---|---|
Vercel Pro | $20+/mo | Low | Low |
Railway | $5-20/mo | Medium | Low |
Render | $7+/mo | Medium | Low |
VPS + Docker | $4-10/mo | Full | Medium |
VPS + Docker + Cloudflare Tunnel | $4-10/mo | Full | Medium |
The VPS route won on cost and control. Cloudflare Tunnel was the key addition that made it production-ready without the complexity of managing SSL certificates, exposing ports, or configuring Nginx from scratch.
The Architecture
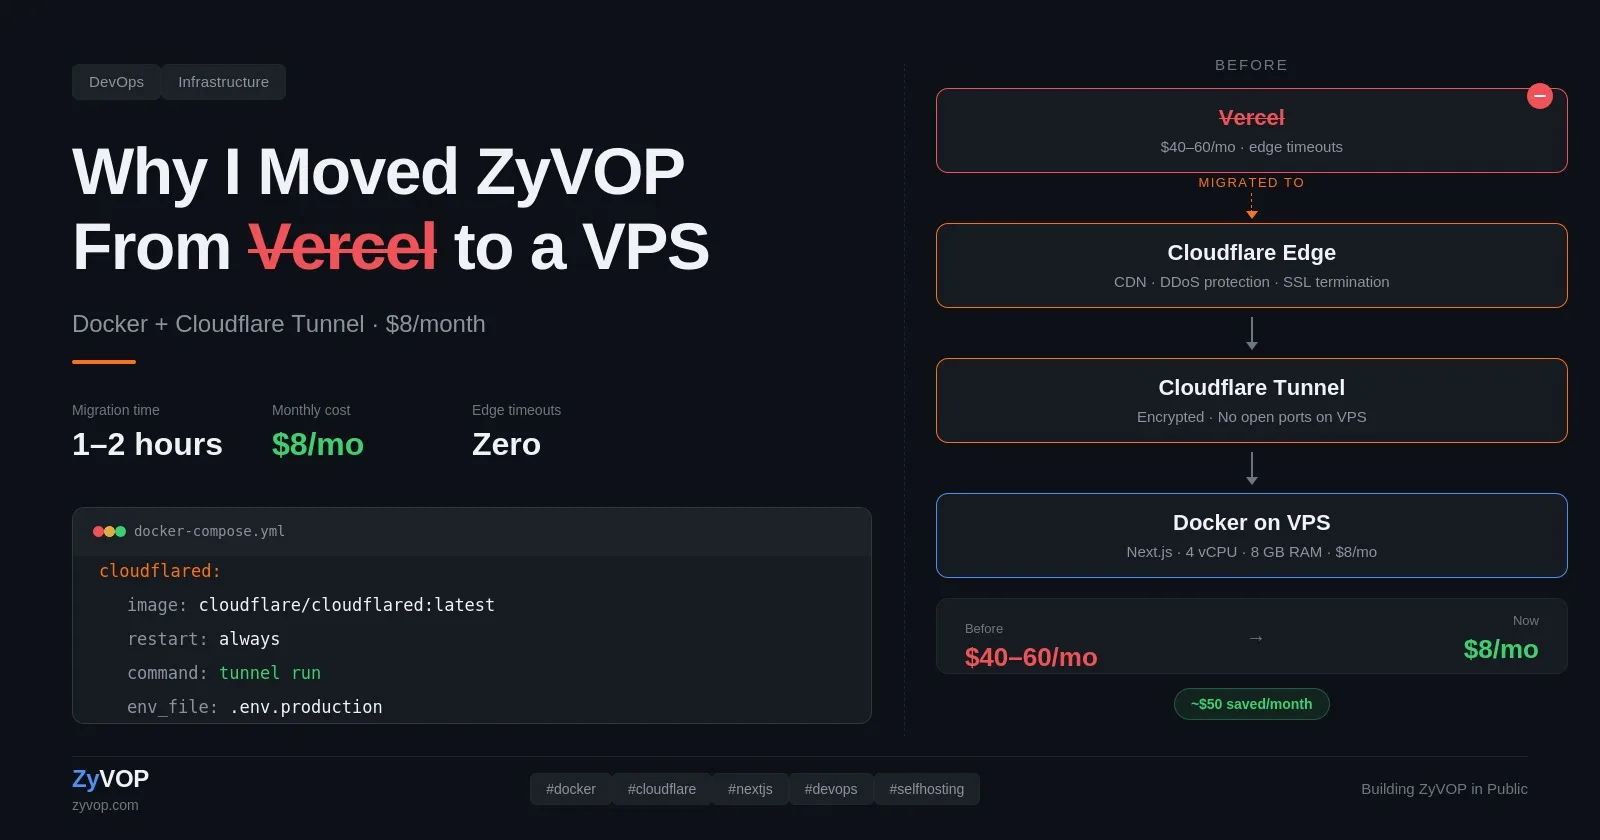
Here's what the traffic flow looks like now:
User Request
     ↓
Cloudflare Edge (CDN, DDoS protection, SSL termination)
     ↓
Cloudflare Tunnel (encrypted, no exposed ports)
     ↓
cloudflared daemon (running in Docker)
     ↓
App Container (Node.js)
     ↓
Background Workers (cross-posting, notifications)
No SSL certificate management. No Nginx config to maintain. Cloudflare handles all of that at the edge. The only port you need open on your VPS firewall is SSH — Cloudflare Tunnel handles all inbound web traffic.
The Setup
1. VPS Configuration
I'm running a VPS with 4 vCPU, 8GB RAM, and 160GB SSD at $8/month. That's more than enough for ZyVOP's current load with significant headroom to scale.
First thing after provisioning: lock it down.
# Create non-root user
adduser deploy
usermod -aG sudo deploy

# Disable root SSH login
sed -i 's/PermitRootLogin yes/PermitRootLogin no/' /etc/ssh/sshd_config
systemctl restart ssh

# Basic firewall — only allow SSH
ufw allow OpenSSH
ufw enable
No HTTP or HTTPS ports open. Cloudflare Tunnel handles inbound traffic entirely.
2. Docker Compose Setup
Everything runs in Docker. Here's the core structure:
# docker-compose.yml
services:
  frontend:
    build:
      context: .
      dockerfile: Dockerfile
      args:
        - NEXT_PUBLIC_API_URL=https://api.zyvop.com
        - BACKEND_URL=https://api.zyvop.com
    container_name: zyvop_frontend
    restart: always
    env_file:
      - .env.production
    networks:
      - external_backend_network

  cloudflared:
    image: cloudflare/cloudflared:latest
    container_name: zyvop_cloudflared
    restart: always
    command: tunnel run
    env_file:
      - .env.production
    networks:
      - external_backend_network

networks:
  external_backend_network:
    name: zyvop_zyvop-network
    external: true
And in .env.production:
TUNNEL_TOKEN=your_tunnel_token_here
NEXT_PUBLIC_API_URL=https://api.zyvop.com
BACKEND_URL=https://api.zyvop.com
Key decisions here:
External network — the frontend connects to the backend via a shared Docker network (external: true). The backend runs in a separate compose stack, keeping concerns cleanly separated.
restart: always — both containers restart automatically after a crash or VPS reboot. No manual intervention needed.
restart: always on cloudflared — the tunnel must never go down. This gets the most aggressive restart policy.
Never hardcode the tunnel token — keep it in .env.production and out of your compose file. If your repo is ever public or shared, a hardcoded token is an immediate security incident.
3. Cloudflare Tunnel Configuration
Setting up the tunnel takes about 10 minutes — and you don't need to install anything locally. Everything is done through the Cloudflare dashboard and Docker.
Step 1 — Create the tunnel in Cloudflare dashboard
Go to one.dash.cloudflare.com → Networking → Tunnels → Create a Tunnel
Note: The old
dash.teams.cloudflare.comURL is retired as of 2026. Everything now lives atone.dash.cloudflare.com.
Choose Cloudflared as the connector type
Name your tunnel (e.g.
zyvop-production)Cloudflare will generate a tunnel token — copy it
Step 2 — Add your public hostname
Still in the dashboard, under your tunnel settings:
Hostname:
zyvop.comService:
http://app:3000
Cloudflare automatically creates the DNS record for you.
Step 3 — Pass the token to Docker
Add the token to your .env file:
CLOUDFLARE_TUNNEL_TOKEN=your_token_here
Your cloudflared Docker service picks it up automatically:
cloudflared:
  image: cloudflare/cloudflared:latest
  restart: always
  command: tunnel run
  env_file:
    - .env.production
With TUNNEL_TOKEN set in .env.production, cloudflared picks it up automatically. That's it — no local installation, no CLI setup, no credentials file to manage. The entire tunnel runs inside Docker and connects on every deploy.
4. Cloudflare Cache Rules
This is where you get Vercel-like performance without Vercel's price. In your Cloudflare dashboard, add cache rules for static assets:
If: File extension matches js, css, png, jpg, woff2, svg
Then: Cache Everything
Edge TTL: 1 month
Browser TTL: 1 day
Static assets now serve from Cloudflare's edge globally — your VPS only handles dynamic requests.
What Broke During Migration
I won't pretend it was seamless. A few things broke:
Cross-posting webhooks — These were firing on Vercel's edge and assumed a specific timeout behavior. Moving them to a persistent worker process actually fixed the timeout problem but required rewriting the job queue logic.
Environment variables — Vercel's environment variable management is seamless. On VPS you manage .env files yourself. Use docker secret or a proper secrets manager in production — don't commit .env to your repo.
Cold starts are gone, but so is auto-scaling — Vercel scales to zero and back up automatically. On VPS your container is always running, which is better for consistent performance but means you need to think about capacity planning.
Cloudflare cache after deleting from Vercel — This one caught me off guard. After removing the site from Vercel and pointing DNS through Cloudflare Tunnel, the site was slow to load for new visitors. The reason: Cloudflare was still serving cached responses from the old Vercel origin. The fix is straightforward but non-obvious if you haven't hit it before:
# Cloudflare Dashboard → Your Domain → Caching → Configuration
# Click "Purge Everything"
Or via API:
curl -X POST "https://api.cloudflare.com/client/v4/zones/{zone_id}/purge_cache" \
  -H "Authorization: Bearer {api_token}" \
  -H "Content-Type: application/json" \
  --data '{"purge_everything": true}'
Do this immediately after switching origins. Don't wait for cache to expire naturally — it can take hours and your users will see stale or broken pages during that window.
The Results
Cost: Down from projected $40-60/month on Vercel Pro to $8/month on VPS — 4 vCPU, 8GB RAM, 160GB SSD.
Edge function timeouts: Zero since migration. Cross-posting now completes reliably on every post.
Performance: Comparable for most users. Users geographically close to the VPS see similar speeds. Users far away are served cached assets from Cloudflare's edge network — so static content is fast globally.
Uptime: 99.9%+ since migration. Cloudflare Tunnel is rock solid.
Would I Recommend This Setup?
For a simple marketing site or small app — no. Vercel is still the right choice. The developer experience is genuinely hard to beat.
For a platform with background jobs, long-running processes, or cost sensitivity at scale — yes. VPS + Docker + Cloudflare Tunnel gives you production-grade infrastructure at a fraction of the cost, with none of the artificial limits.
The migration took about 1–2 hours including testing. The cost savings paid for that time investment within the first month.
What's Next
The current setup handles ZyVOP's beta load comfortably. When we need to scale:
Add a second VPS and load balance via Cloudflare
Move the database to a managed service
Introduce Redis for the job queue
But that's a future problem. For now, $8/month and zero timeouts is exactly where we need to be.
ZyVOP is a developer publishing platform with auto cross-posting to Dev.to, Hashnode, and Medium. If you're a developer who writes, publish your first post here.
Comments (0)
Join the discussion by logging into your account.
No comments yet. Be the first to comment!